-
Broadcast Captioning
-
Live Captioning
-
Transcription
- Articles coming soon
How to Add Captions to YouTube Live
How it works.
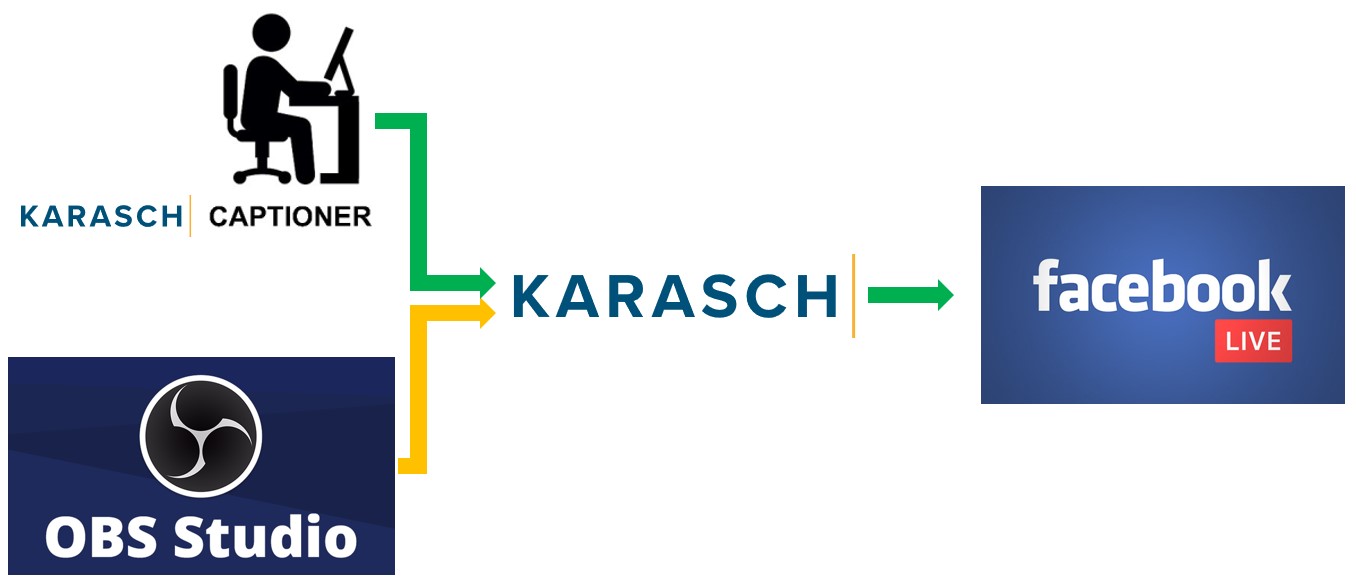
One method of adding captions to a live stream takes to captioner’s text stream and embeds closed captioning into a video source stream using a virtual encoder. This method yields the best results for properly aligning captions with the video but requires more equipment to set up than other methods, like using an API token. The resulting stream may be displayed on common video streaming services, such as YouTube and Facebook, giving viewers the option of turning captioning services on or off.
Prerequisites
Before we can begin, you will first need to have a streaming software installed on your machine that can handle RTMP links. A free and versatile option is Open Broadcaster Software (OBS) Studio.
Setup Overview
Once you have your streaming software selected and prepared, you can begin your setup. You will need to setup two programs for this to function properly. We will go over the instructions in a sequential order so you don’t get lost.
- YouTube Live (we recommend that you begin this setup at least 1-2 hours before your event is scheduled to go live).
- If you are creating a new YouTube channel, you will need to do so at least 48 hours before you plan on your first stream. This is a security measure that YouTube has in place to mitigate spam accounts.
- Your Broadcast Software (we will demonstrate with Open Broadcaster Software (OBS) Studio).
How do I set up captions on YouTube Live?
To configure live captioning services, which are referred to as CART (communication access real-time translation) captioning services with YouTube Live using a virtual encoder, you need to do the following:
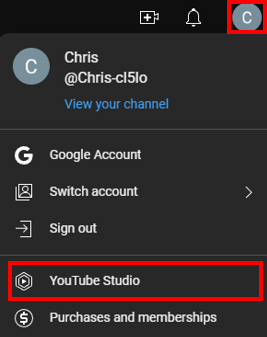
- From YouTube, click your profile icon and select “YouTube Studio”.
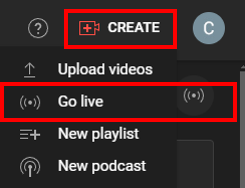
- Click the “Create” button near your profile icon to open the YouTube creation options.
- Click “Go live”.
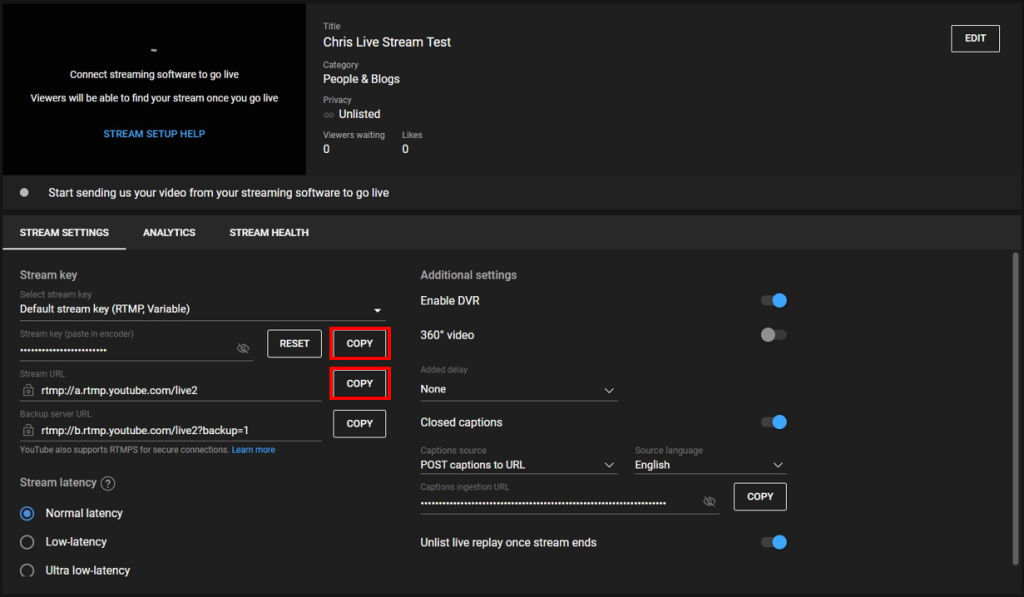
- On this page, copy both the Stream URL and Stream Key to an e-mail addressed to [email protected] and [email protected].
- You will now have to switch to setting up your broadcast software before you can go live.
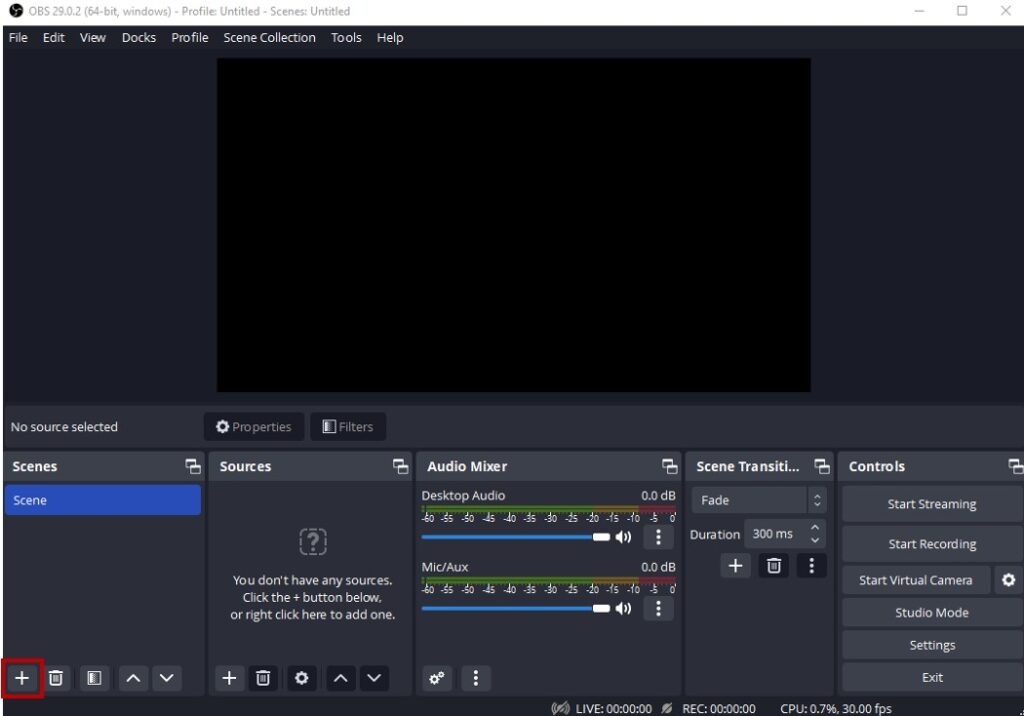
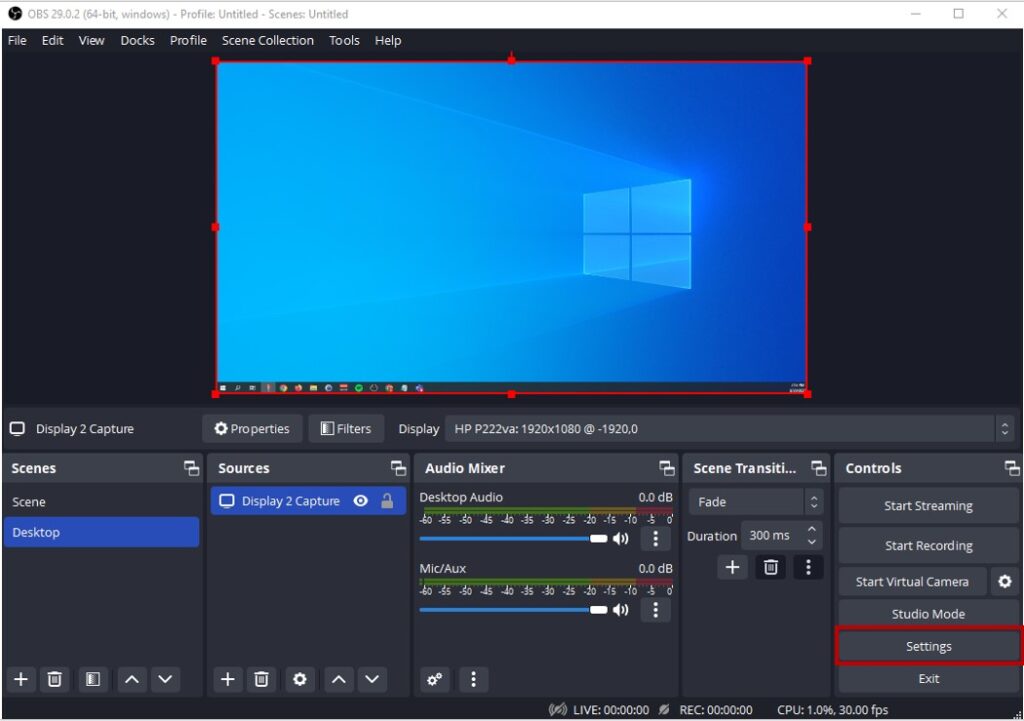
- If this is the first time you have used OBS, you will need to first set up your scene. You can do so by clicking the + button under “Scenes”.
- For this example, we configured OBS to stream our desktop view.
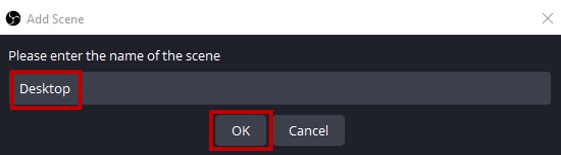
- Give your scene a name.
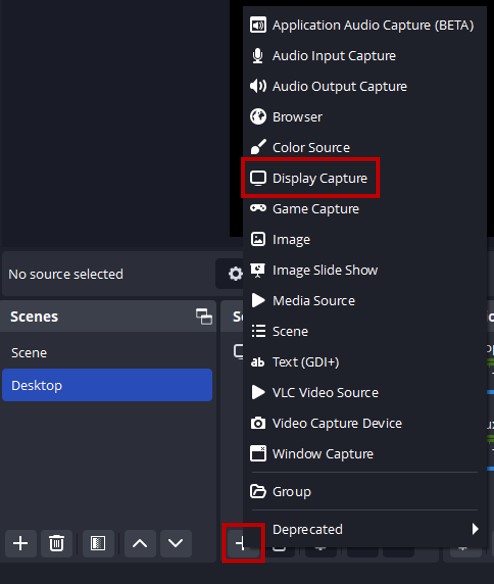
- Add a source to the scene.
- Since we are setting up a desktop scene, we will choose to add a “Display Capture” here. You can play with the other options to see what would work best for you.
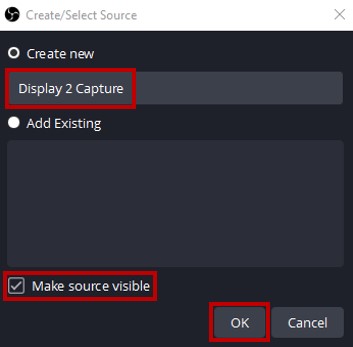
- Give your source a unique name and make sure it is visible.
- It cannot have the same name as any other source used in other scenes.
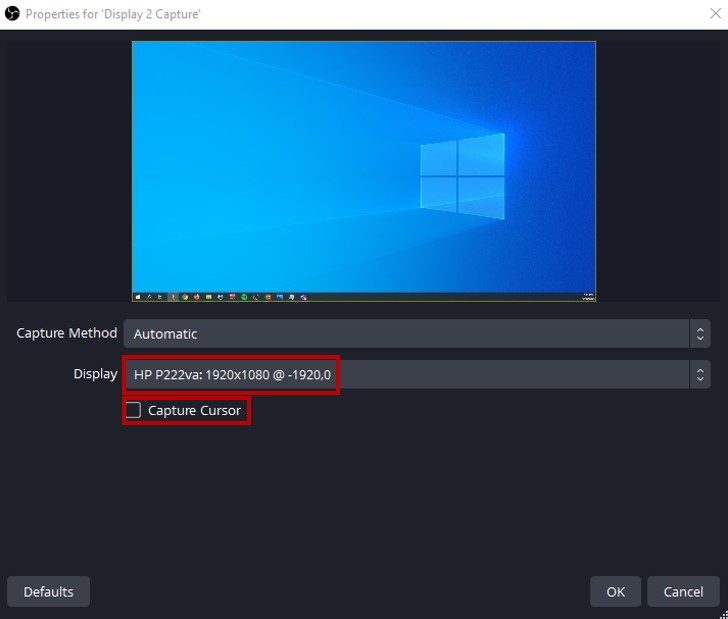
- Set up the source details.
- Since this is a display capture, the details include picking your monitor. This window will look different depending on the source you select.
- For my streams, I typically don’t like my mouse to be visible, so I will uncheck that box. This is completely optional.
- Now that your scene is set up, you will need to set up your stream output. Go to settings.
- This part requires information from us to complete. If you just sent us the information, we may not have seen it yet. If it has been a little while and you’ve not heard back from us, please feel free to reach out so we may sort out the details.
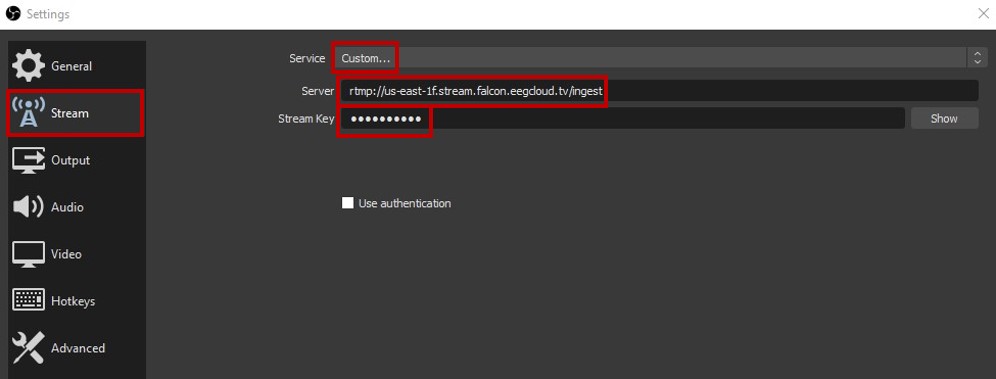
- Navigate to the Stream section.
- Change the service to “Custom”.
- Add the Server link and Stream key that we supply you.
- We cannot send you this without you first sending us the YouTube Stream URL and Stream Key from step 4.
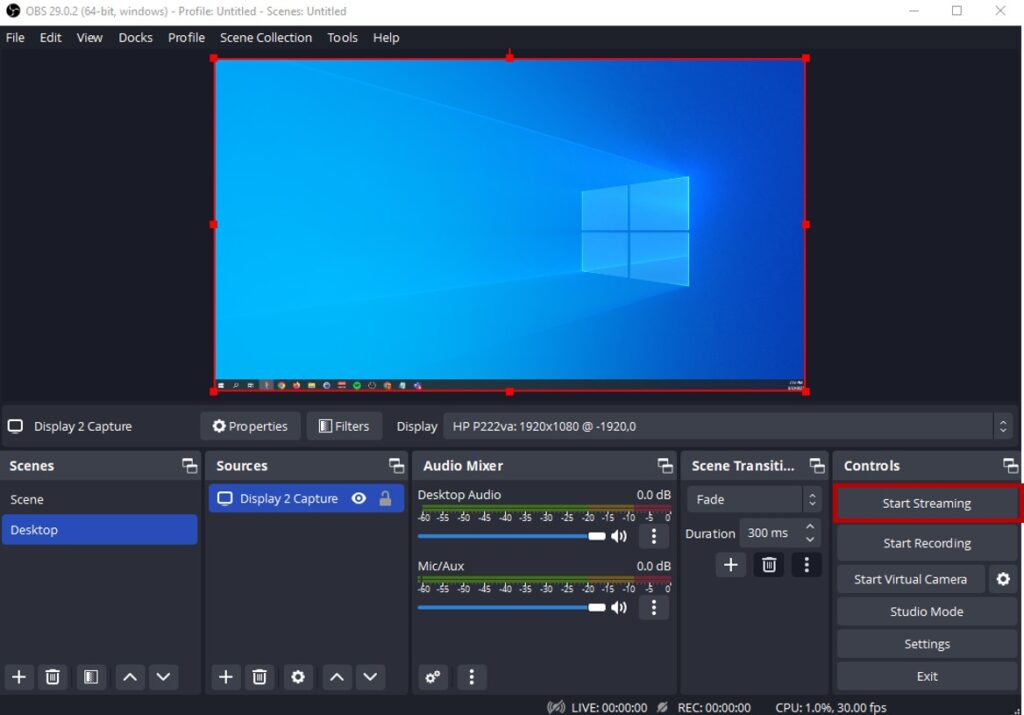
- Click on “Start Streaming”.
- You can now switch back to the YouTube Live configuration screen to confirm everything works and complete the setup.
- Please note that it may not instantly recognize the stream has started. There is typically a 10-15 second delay during setup. After the stream has started, this typically stabilizes at around 5 seconds of delay.
- You will see a preview of your stream in the Video Window. When you do, you’re ready to go live.
- Note that the captions will not be visible in the preview. This is normal.
- When you go live, you can preview your stream in another window.
- Viewers will be able to turn on the captions if they choose, but they will not be on by default unless they have set that setting in their personal preferences.
YouTube Live Setup with Screenshots
1. From YouTube, click your profile icon and select “YouTube Studio”.
2. Click the “Create” button near your profile icon to open the YouTube creation options.
3. Click “Go live”.
4. On this page, copy both the Stream URL and Stream Key to an e-mail addressed to [email protected] and [email protected].
5. You will now have to switch to setting up your broadcast software before you can go live.
6. If this is the first time you have used OBS, you will need to first set up your scene. You can do so by clicking the + button under “Scenes”.
7. Give your scene a name.
8. Add a source to the scene.
9. Give your source a unique name and make sure it is visible.
10. Set up the source details.
11. Now that your scene is set up, you will need to set up your stream output. Go to settings.
12. Navigate to the Stream section.
13. Change the service to “Custom”.
14. Add the Server link and Stream key that we supply you.
15. Click on “Start Streaming”
16. You can now switch back to the YouTube Live configuration screen to confirm everything works and complete the setup.
17. You will see a preview of your stream in the Video Window. When you do, you’re ready to go live.